Category Archives: Homebrew Tips

Clean Your Lines- it’s Not Just for Bars!

Unclean Keezer Line Beer on Left

I was doing an evaluation on a homebrew canning machine a couple months ago.  As part of that review, I was trying to assess how the carbonation of the beer held up for the beer that was canned, as compared to beer coming straight from the tap.  I poured the golden beers and when lining them up for the side-by-side shot, in horror, I noticed the telltale unhealthy haze in my draft beer.  The beer from my tap went through my beer lines of the keezer, whereas the canned beer was filled via a separate liquid line attached directly to the keg.

There’s a glowing haze of an unfiltered homebrew that looks magical, and almost looks like the beer is glowing.  Haze from dirty beer lines has a slightly white/gray appearance, almost like it’s been mixed with dose of soapy water.

I’d encounter this in some restaurants and bars, and could identify it instantly by its distinct look.  It would have a distinct sour tinge to it, and whatever the beer was, it made it tasted a bit gross.  I used to shake my head in a “for shame” sort of way, as I explained to my table mates that this place obviously didn’t take care of their beer lines properly and were serving beers through dirty lines.

The Brewers Association has a Draught Quality Manual they make available for free.  They spell out a cleaning regimen of every 2 weeks to flush the lines with a caustic cleaner and remove the faucets to clean them.  I thought that sounded like too much work, so I opted for about once a month.  That slid into about every 2 months, and then became ever less frequently due to sheer laziness.  I told myself that with beer continually flowing through the lines, nothing had a chance to go stagnant and contaminate them.  I was wrong.

I have yet to establish a set cleaning interval with proper rigor, but I do now know my homebrew draft lines are not immune to the telltale disaster of dirty beer lines I’d scoff at in bars & restaurants.  Clean your lines!

Clean Your Taps Regularly- The Actual Tap…

Ask almost anyone about homebrewing, and the worst part is the cleaning.  It seems like you easily spend 50% of your “brewing” time, cleaning stuff.  And there are people I read about on homebrew forums that seem to take it to extreme.  So I try to take a minimalist approach, just doing what seems to be efficient and absolutely necessary.

I clean the beer lines on my keezer periodically, at varying intervals.  I’m always looking for the most efficient process/product to get this done.  I had read online about in addition to cleaning your beer lines, you also need to periodically remove your taps and clean them.  I thought that sounded like foolishness from clean freaks.  As long as I was pumping cleaning fluid through my whole system, the taps of course would get clean in the process.  Wrong.

I’m in the process of rebuilding my keezer collar, so I disassembled all the hardware to move to the new one.  On removing my taps for the first time in 2-3 years, I found this nasty looking goopy slime inside them.  It looked like and smelled like yeast residue.  Looking at the shape of the beer shanks and taps, and applying my engineering brain to the task, it made complete sense.  You’ve got beer flowing along through narrow diameter tubing from the keg all the way up through your shank.  But as it reaches the end of the shank, it opens up into a chamber.  So in that flow, it suddenly drops in pressure, and you get this pooling.  (Just like in a river, which if you’re a fly fisherman, you know what I’m talking about.)

So over time, with different beers flowing through, when the beer hits this chamber, if it’s maybe the start of the keg it’s got a bit of extra yeast in suspension.  That falls out and settles down into this chamber.  As I run cleaning fluid through, it doesn’t push this yeast out, because of the low pressure chamber effect.  I found my random assortment of shanks acquired from different places at different times had different shapes at the end of the shank.  It seemed the one with the gradual cone transition from small beer line to full shank diameter had negligible amounts of this residue.  The others opened up quickly, and these had more residue.

I don’t see this advertised at all when buying a shank, you just pick the length, and whether you want stainless, or chrome-plated brass.  Regardless, I’m not sure how definitive a contribution the shape of the end of the shank makes.  So now I’ve got a new list of maintenance for my new keezer- disassemble and clean the taps periodically!

Mash Conversion Efficiency Experiments

Since moving from my single-vessel eBIAB set-up to a 2-vessel system (one kettle is the mash tun, the other is my boil/heating kettle), I couldn’t hit my predicted OG.  So I set out to do some experiments to determine how to improve my efficiency.  None of these changes were anything I came up with on my own, just a collection of actions I read from others.  I just wanted data to quantify the impact on my set-up.  And I wanted to study the different processes with an eye on overall brew time.

EXPERIMENT SET-UP

7 lbs 2-row
1 lb Crystal 40L
0.5 lb White wheat

Mash @ 1.4 qt/lb for 60 minutes @ 150F
Water + brewing salts + acid added to 5.6 pH
Sparge water @ 168F
Target pre-boil volume 7.5 gallons


BASELINE RUN

My base process since going to the 2-vessel system was to do a 1.4 qt/lb mash in my Mash Tun (MT), and then transfer in all of my sparge water that was heating my Boil Kettle (BK) on top of the mash.  I would then drain water off the mash over a 20 minute period back into the BK.  I crush my own grain, with a gap setting of 34 mil.

After mash was complete, it took me 20 minutes to collect the 7.5 gallons of wort into my BK.  Conversion efficiency was calculated at 70.4%


RUN #2 (ADD SINGLE SPARGE STEP)

After the 1 hour mash, I’d run off all the wort in the MT into the BK.  Then I’d fill the MT with the full sparge water volume, stir up the grains, then vourlaf until things became clear.  After that, I’d transfer to the BK until I collected the 7.5 gallons of pre-boil wort.

It took me 23 minutes to collect the pre-boil volume.  Conversion efficiency increased to 75.3%.


RUN#3 (SINGLE SPARGE WITH  TIGHTER CRUSH)

Same process as Run#2, except this time I tightened the gap on my rollers down from 0.034″ to 0.026″.

For the same 23 minutes, conversion efficiency increased to 82.7%.


RUN#4 (20-MINUTE FLY SPARGE)

Same process as Run#3 with the 0.026″ crush, but instead of the single batch sparge, I did a 20-minute continuous fly sparge.

For an extra 5 minutes (28 minutes after the mash was done), conversion efficiency increased slightly to 83.9%.

Dial Thermometers Have an Adjustment Screw for a Reason

There’s a lot of gear I get that I assume is already calibrated accurately out of the box, just because it’s easier for me to assume that.  That means I can just get down to using it, and don’t have to waste time on boring stuff.

I recently got a couple of dial gauge thermometers from Spike to use in my Spike brew kettles.  Of course they recommended checking the temperature reading at a temperature near where you plan to use it most, and even provide a convenient set screw on the back.  But I just dove in and started using it.

On my first brew I just took it at face value to be accurate.  The second time I used it, I decided to check it with my highly accurate digital lollipop thermometer that comes with calibration certification paperwork that it’s good to 0.1 degrees F.  I found that although the dial read 143F, my lollipop thermometer read 156F.  That’s huge at mash temperature.

The set screw is super easy to use.  Just turn it (pliers or screwdriver) and you can see the dial face rotate around.  I have other probe thermometers that don’t have a separate calibration screw, but you just turn the nut at the back face and you see the same change.

Next time I won’t be so lazy.

Don’t Quit Early if FG Higher Than Expected

So I’ve been using these Tilt Bluetooth Hydrometers now for several batches.  They’re awesome that they give a view into your fermentation progress continually.  Every 15 minutes, it writes an update into a Google Sheet with the current SG and temperature.  Taking data so frequently, you can see the trends of fermentation as the gravity drops and progresses towards the finish.

From this data, it’s pretty easy to see when fermentation is done.  SG goes flat and is no longer dropping, even with steps up in fermentation temperature.

So I was fermenting a Plain Wheat Ale, using Wyeast 1010 American Wheat Ale.  Wyeast gives this a pretty broad fermentation temperature range of 58 – 74 F.  For this particular fermentation, I was using a fermentor that I didn’t have cooling temperature control, only heating.  So I left it to do its work at my basement temperature of 63F.

Fermentation took a little while to start off, but I soon had an overflowing krausen getting pushed out the top of the fermentor.  After a day and a half, fermentation started to slow, so I added some heat and let it climb up to 65F.  That didn’t really move the gravity any more, and I figured that maybe this one was just going to finish high on FG at 1.015 versus predicted 1.012.  I had a screwed up mash, so I figured maybe that was as close as it would get.

I then went on to my diacetyl rest where I bumped it up 5 degrees, which made it 70F.  It was hard to tell at the time, but it looked like it was maybe starting to drop a bit, so I bumped it up again to 75F.  It then started a clear steady trend of dropping gravity and dropped another 8 points of SG.

I took away two lessons from this one.  First was to pay attention to FG.  Although BeerSmith’s FG prediction is just based on standard attenuation numbers from yeast manufacturers, and yeast manufacturers provide a range of attenuation, it’s still a good goalpost to keep in mind.  In the future, if I’m still a little bit high, I’ll bump the temperature up again and then sit and wait to see if there’s still more to go.

The other lesson I learned was if I’m fermenting a yeast on the colder end of its temperature range, I need to make sure I push it through its full range of temperature to make sure it’s really done at the end.

With this Wheat Ale, I was trying to get full body and mash at a 156F single rest step.  But I had trouble with my new set-up of keeping the temperature steady there (lost 6 degrees through the mash), and at some points a lot of the grain bed was drained so I could try to heat up the water in another kettle.  I also had some temperature dial issues, and I really may have been starting as low as 143F instead of 156F.  So the fact that the Tilt shows it finished up at 1.003 is indicative of my messed up mash and I probably was pretty cold.  Anyway, hopefully it still tastes good…

Wort Aeration Stones- Yes, they really do mean to boil it…

So I got some wort aeration stones to use to add oxygen to my wort before fermenting.  They typically come with either a 0.5 micron stone which you’re supposed to use with pure oxygen, or a 2 micron stone which you’re supposed to use if using an aquarium pump to push air.  As it was explained to me, the pure oxygen disperses better through the 0.5 micron pores, but that’s too tight for the aquarium pumps to handle, so they push the air through 2 micron pores.

Not sure I totally understand the science behind that, but it’s simple enough for me to just accept it.  These 2 stones have different cleaning methods specified.  For the 0.5 micron stone, I was told I had to boil it to sanitize it, whereas the 2 micron stone could be soaked in StarSan.  Here’s where I didn’t follow the advice that came on the packaging.

I assumed the boiling recommendation was just a product of over-zealous contamination-paranoid homebrewers, the likes of which are disassembling their 3-piece ball locks in between brews to scrub and boil.  So I blew off that recommendation and just sprayed the stone with my spray bottle of StarSan solution.  I figured it worked for everything else, and I personally had never experienced a contamination/sanitation issue.

I then found after brewing a couple of batches where I used the 0.5 micron stone, that the beers developed a sweetness to them after being in keg for a few weeks.  This was present across several beer and yeast types (Pilsner, Black Lager, IPA).  It wasn’t until my IPA had the same sweetness that I made the connection to my shortcut sanitation process on the oxygen stone.

Suddenly the cleaning process made sense to me.  The small pores in the stone were small enough that my spray of StarSan was only going to get to the outside surface.  By boiling it, I heated up the whole thing- inside and out- and the temperature could then kill off whatever wild yeast/bacteria had taken up living in it in between brews.

So now I boil the stone for a couple minutes.  And I can no longer tell people that “I personally have never had a contamination/sanitation issue.”

Hyper Active Fermentation Needs Cleanup

I had a big batch of stout I made the other day.  It was a repeat brew because the previous run of this recipe turned out great and I wanted more.  So I was greedy and went for a big batch (targeting 5.5 gallons instead of 5).  As a result, my fermentation bucket was pretty full, and pitching 2 pouches of yeast in there really got things going.

I was using my Cool Zone temperature control system from Gotta Brew to keep things cool to start off with and manage the active fermentation heat, and then utilize electric heater to raise temperature as I progressed farther along in fermentation.  The Cool Zone comes with an insulated jacket to go around your bucket but let water & electric lines out to feed the cooling jacket and electric heater.  I recall some advice I was given about not letting things get dirty in there because keeping things in the cool dark would breed nasty stuff (foreshadowing).

cool-zone-ready-to-hook-up-to-ice-water-pump

So a couple days in, my yeast had taken off wildly and my small headroom in the bucket plugged my 3-piece airlock and yeast foam started to come up from below.  I switched over to a blow-off tube set-up, but I had already bubbled over onto the lid of the bucket.  The words were echoing in my head about not letting things get dirty in there, but I was pressed for time, so I didn’t clean it up.

A week and half later when I’m finished with fermentation and ready to transfer to a carboy for cold crashing, I notice a couple small flying bugs around my yeast mountain bubble over.  As I pull the bucket out further, I see they’ve decided to lay some eggs on Mt. Yeastmore and I’ve got a group of tiny larvae wriggling around enjoying their yeast bed.  It was disgusting.  So definitely heed the advice and clean up any yeasty bubble overs since it’s too enticing for insects to pass up (apparently).

hyper-active-fermentation-needs-cleanup


Exploring All-in-one Electric Brewing Systems

Every homebrewer has their own unique perspective on the hobby.  Different reasons of why you got into the hobby, different parts of it that bring you joy, different parts you hate, and different things you want to get out of it.  Some people started in homebrewing because they just wanted to make something of their own, and as long as it’s homemade, they don’t sweat the details.  Some find joy in building their own mega-system, customized to their own design and made up of bits procured from homebrew shops, hardware stores, and obscure hobby websites.  Others are just into developing the perfect recipe they’ve got trapped up in their head.  The list can go on and on.

When I first saw all-in-one brewing systems in the LHBS, I scoffed and said, “Who’d want to brew in one of those?  It takes all the fun out of it.”  The guy working replied, “Well, unless your joy comes from the recipe creation process and working to perfect your recipes.”  I was skeptical, but it did get me thinking about what my personal joy of homebrewing was driven by.

I started my homebrewing life probably similar to many.  I was really into beer, and the idea of making a hobby out of it, made it sound more sophisticated than just sitting around and drinking it.  It was fun, but the lackluster results left me struggling to justify why I should go through all the trouble just to make 2 cases of mediocre beer when the beer store was overflowing with great options.  I plugged along in the love/hate relationship for several years with extract and partial mash brewing, never quite satisfied with the results.  Before giving up on homebrewing altogether, I decided I’d give it one last shot and I invested in some all-grain equipment to see if it was all it was purported to be.  It was a Eureka moment as the telltale extract sweetness was gone and I was enjoying the beer now and all the newfound control knobs to experiment with (grains, mash temperatures, process details, etc.).

So after the words from the LHBS about all-in-one systems bounced around in my head for a few months, I started to see some merit in them.  While some of the systems were marketed to appeal to extract brewers in an attempt to make the all-grain process seem less scary, for me it wasn’t about that.  I was already all-grain brewing and loving it.  Or at least most of it.  Two things that nag me are process repeatability/control, and the length of time of my brew day.

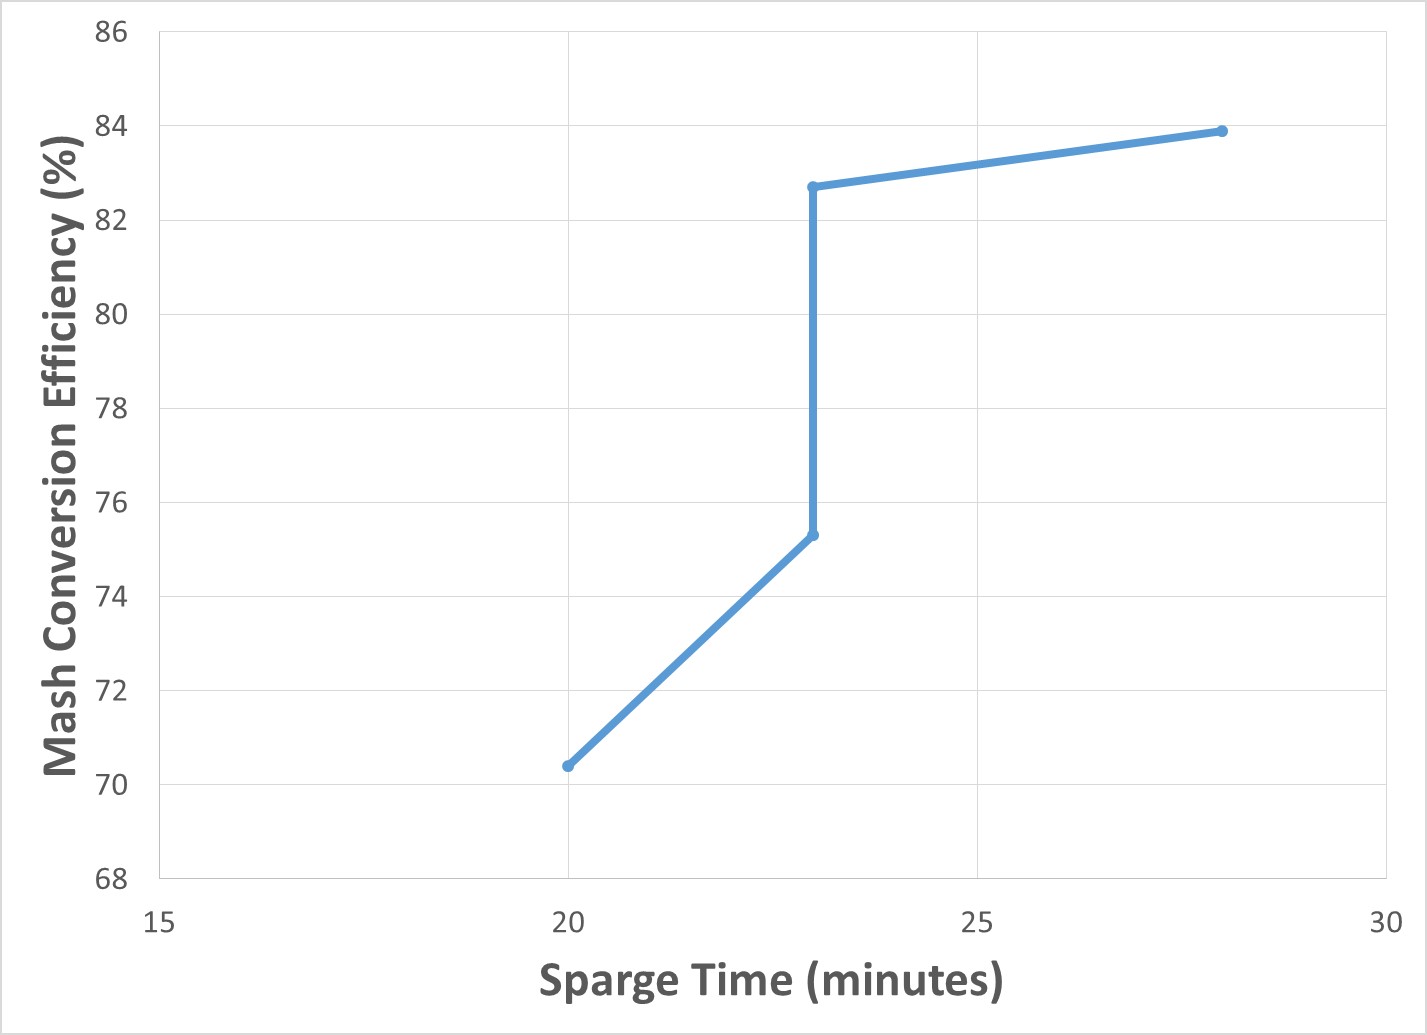
As an engineer, my whole brewing process is very detail-oriented.  Starting from my recipe formulation on what exactly I’m trying to accomplish, what ingredients will best help me achieve that, and what aspects of the process I need to control.  I write it all down in a detailed brew log notebook on brew day, and then I savor and analyze the results taking more notes on what I think worked, what didn’t, and what I should change next time.  Here enters my 2 nagging problems.  If I want to make that Pale Ale again, but tweak the malt flavor by modifying the grain bill, I want everything else to remain the same so I know if I was turning the right knob or if I should pursue some other change.  But if I get largely varying mash efficiencies, or don’t have good control of mash temperature, I frequently find I’m changing more things than intended.

Everyone’s life has its own list of things that keep you busy.  For me, it’s being married and having 2 young boys.  So trying to carve out an 8 hour chunk of time for brew day can be a challenge, and that means I can’t brew as frequently as I want.  So when I do get a brew day planned, it’s a fight between going back to that Pale Ale recipe to try out my tweak or making that Dusseldorf Alt that popped into my head 2 weeks ago and I can’t stop thinking about it.  If a ‘Brew Day’ could be morphed legitimately into a ‘Brew Afternoon’ or ‘Brew Night’, I’d have time to do both Pale Ale Version 2.0 and Dusseldorf Alt 1.0.  In other words, I could develop my skills at brewing more quickly by being able to go back and really experience what the process and ingredient changes make in the finished beer.  I’ve heard several people mention that it takes 3 attempts at brewing a given beer/recipe until you can get it dialed in at exactly where you want it.  I definitely have had the same experience.

More to come on my experiments on HomeBrewTalk.com in the near future as I compare multiple systems.

Get Your Grains Bagged Separately

All Grains Bagged TogetherWhen ordering grains online at the homebrew shop, you usually have the option of whether you want them bagged altogether or separately.  It’s always better separately for a number of reasons:

  1. If you’re grinding your own grains, you’ll find some grains need a different roller setting to get a good crush.  If they’re all in the same bag you’ll risk getting some over-crushed, or some under-crushed.
  2. When they’re separated you can easily do a spot check to ensure you’ve got all of your grain bill, and if you so chose re-weigh it when you get home.  I’ve gone over my order in the car before only to find a missing bag of something or a bonus bag of something else.  If it was all in one giant bag, I’d never now that I had a shorted or mixed up grain bill.
  3. Some grains (caramel malts for example) already have their starches converted, so there’s no need to mash them to extract their potential.  Instead you can just add them at vorlauf time and get their effect without risk of extracting extra harshness.  This method works exceptionally well with black malts.
  4. To get a good understanding of your recipe and relation to the finished product, it can be useful to get a crunch on a kernel of grain or two, knowing what it is.  Knowing what a particular malt tastes like may help you distinguish that flavor in the finished beer.  It might be something you love and want to keep around, or it might be something you don’t like and want to exclude from future batches.

So although you might feel high maintenance to get it all bagged separately, there are good reasons to do so.  And if your homebrew shop gives you the option of selecting that while ordering online, it’s as simple as one click.

Don’t Use Garbage Disposal for Spent Grains

I was trying out an electric all-in-one brewing system, and appreciating the fact that I could brew indoors, meaning I could brew in the evening.  Not having to fumble around in the driveway in the dark with a flashlight was part of the appeal of going electric.  So my brew day went a bit longer than planned and there I was about 11:30 at night, finished with my brew day, and trying to clean up.

I didn’t want to go outside in the dark and scoop my spent grain into a bag, so I started thinking.  Since I’ve rinsed remnants of spent grain out of my mash tun out in the kitchen sink and ground them up, and the fact that grains are all-natural, I thought, “Why not?”

So I proceeded to scoop out the aftermath of 11 lbs. of spent grain into the sink.  I was a bit alarmed at how much that pile of grain filled up the sink, but I was tired and eager to finish up the brew day.  I turned on the faucet and started running water and scooping grain into the disposal while it was running.  I figured as long as I washed it with a lot of water, and took it slow, I’d be fine.

I soon found that I wasn’t fineDont Use Garbage Disposal for Spent Grain 
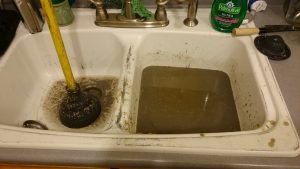
and the drain wasn’t clearing.  I brought out the plunger, but it didn’t help.  In the end I had to do what I was trying to avoid in the first place and scooped the grains out into a bag.  But I also had a clogged sink as a bonus.  I had hoped that after sitting overnight it might somehow magically clear but it didn’t.  The next day I had to take the pipes off under the sink to clear them out and snake them a couple times before finally getting it to clear.  Lesson well learned as to the limitations of the kitchen sink garbage disposal.